About Me

My photo
Melrose, MA, United States
Hi there, and thanks for visiting my Blog! How did I get started? Well, when I was pretty young, my mom taught me all the basics of sewing. It seemed to come natural to me, and by the time I was in middle school, I began to make lots of my own clothes. I did some sewing for people I knew, (including my mom!)and then bought my first sewing machine in 1986 when I decided that I would make my own wedding gown! I live in Melrose, MA with my husband and our 3 boys. When expecting our first, I started to make dolls, just in case I had a girl. I continued making and selling them as they were fun to make and customize for a special girl. I work out of my home and have had the great experience of making gowns, home fashions, dolls and doing many alterations over the years. My work has been largely word of mouth, with very little advertising. I think you will find my work unique and would like to create something special just for you!
Showing posts with label bridal satin. Show all posts

Sunday, September 9, 2018

A gown all her own


In my years of doing bridal alterations, I have taken in, let out, added/removed a belt/sash, added/removed straps, added/removed tulle and bustled, bustled, bustled!!!

Earlier this year (March 2018) I received my most unusual request. To add color ,and in doing so, also redesigning the style, of her wedding gown!

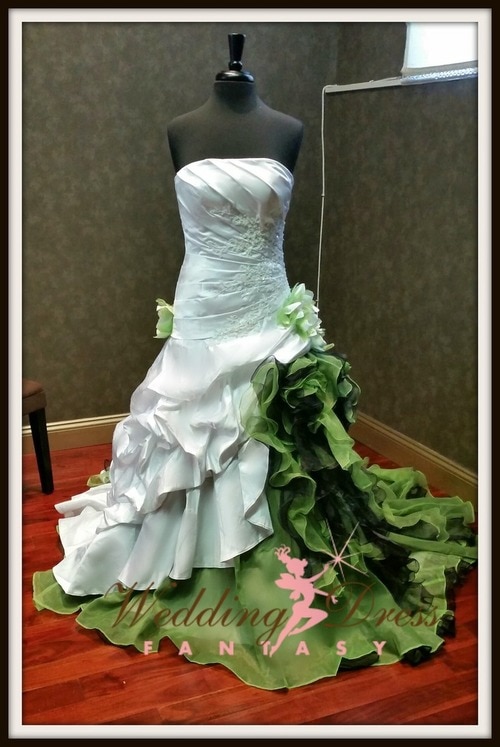
Interesting, I thought. "what color?", I asked....."lime green", she responded....oh my! I thought...
Then the bride sent me photos of her in the gown with some scribbles drawn on to where she would like the color added, and of gowns where she saw green added. Those photos were more of the style that she liked, the green was not the right shade for her.

Ok, this made sense. When she first came to me, she had on a lime green fitbit, a lime green phone case, and her dress had white, black and of course, lime green in it. It was obvious that it was her favorite color, and looks great with her dark skin.

I was intrigued. I LOVE a challenge, especially given enough time to bring it to fruition. Her wedding is September 9, 2018 - the date I decided to write this blog.

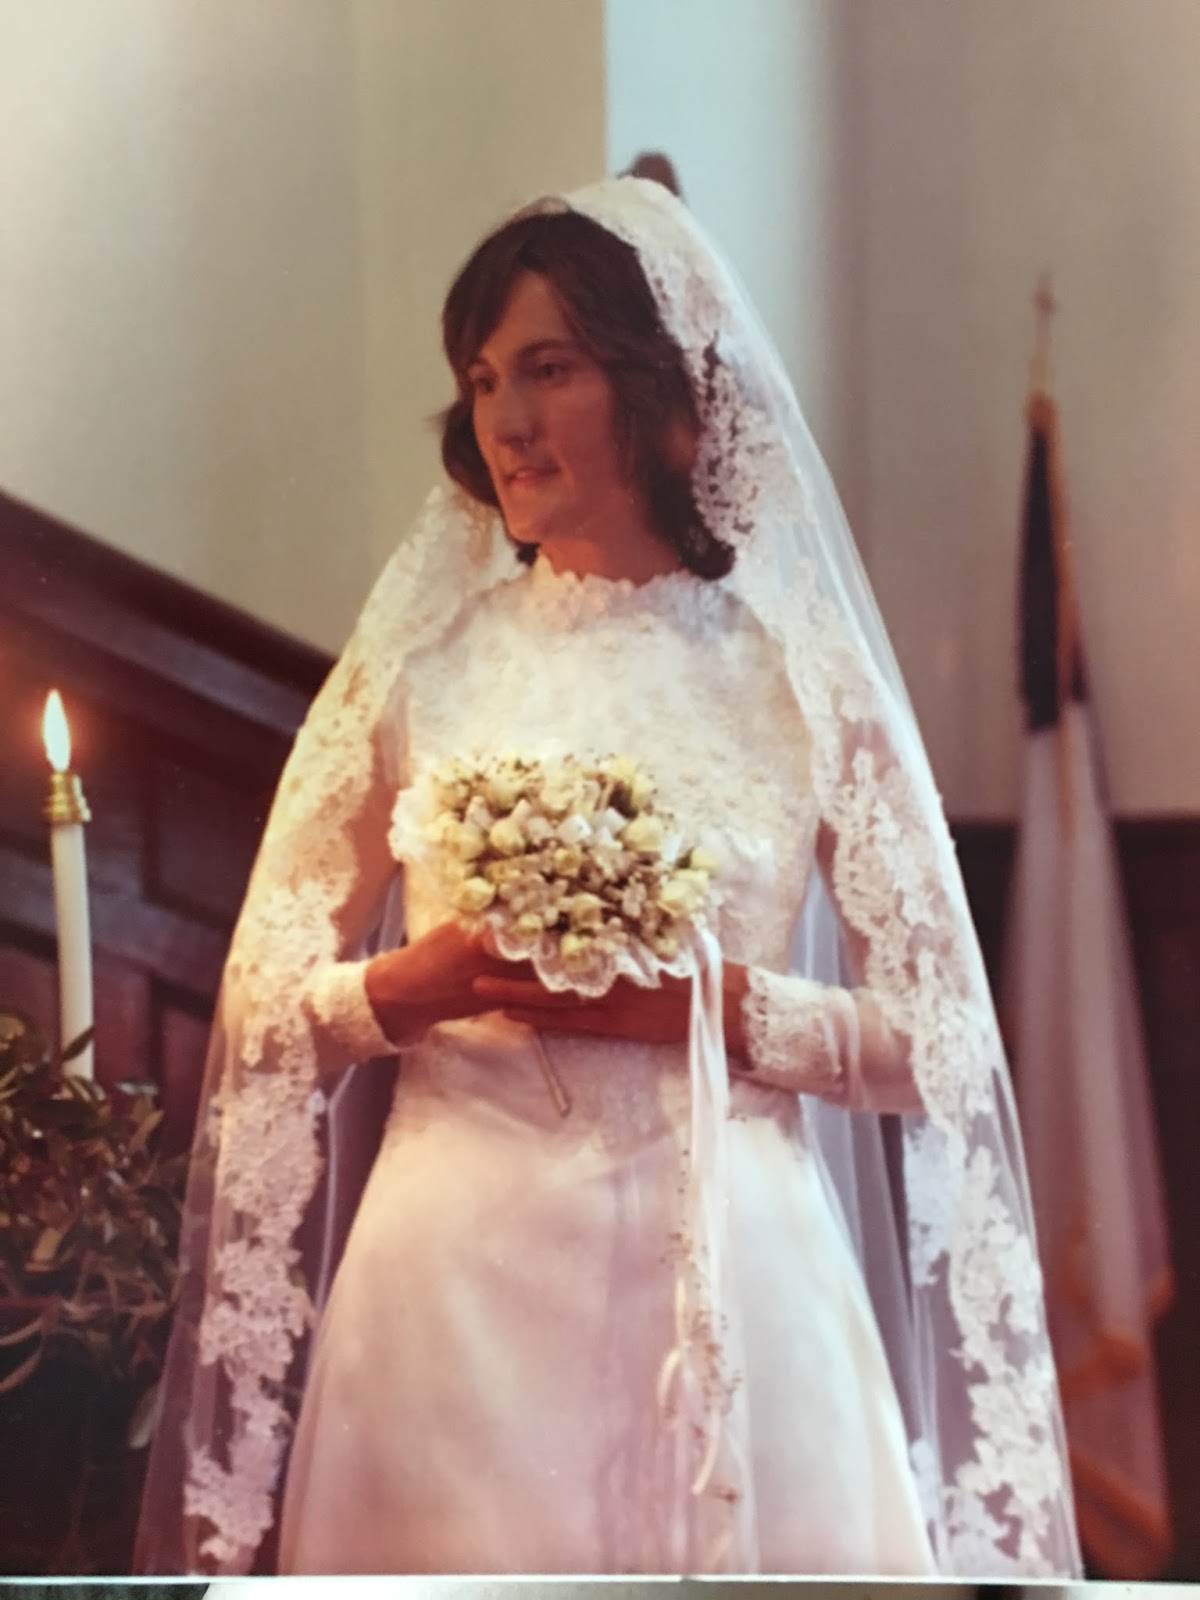
Story behind the gown - bride had been previously engaged and bought a beautiful lace gown for her wedding. The engagement was broken off, but she kept her gown. Fast forward...engaged to be married in 2018, she wanted to use that gown, but because it is for her new love, she wanted to make it special, redesign it. She had seen photos of wedding gowns with color added, and decided to search for someone that would be able to do that for her. She found me.

Timeline:
March 11, 2018 Alexa came to my house to discuss her design ideas.
April 12, 2018 I received some fabric samples from her, and a deposit in the mail
May 12, 2018 She brought her gown to me
June 1, 2018 I was able to order tulle in the color she wanted (to match bridesmaids) from Azazie!
July 30, 2018 First fitting - decided to add another layer of the green to the train to enhance the color, placed the bustles and the band at the bustline, ruffled the lace/satin layer in front and back (forgot her shoes!)
August 11, 2018 Fitting with her shoes - adjusted placement of the side ruffles - brought orange tulle with her - wanted just a small amount added at center of "flower" at top of ruffles, pinned green tulle to train so it stays nicely in place, Length was perfect with her shoes.
August 26, 2018 Gown was picked up!!!!!


One layer of Tulle added - gathered at top to avoid having a seam


Bustled!!!


Front of gown she liked
Original gown - back
Back - newly styled and color added!
See how it matches her inspiration on the left!
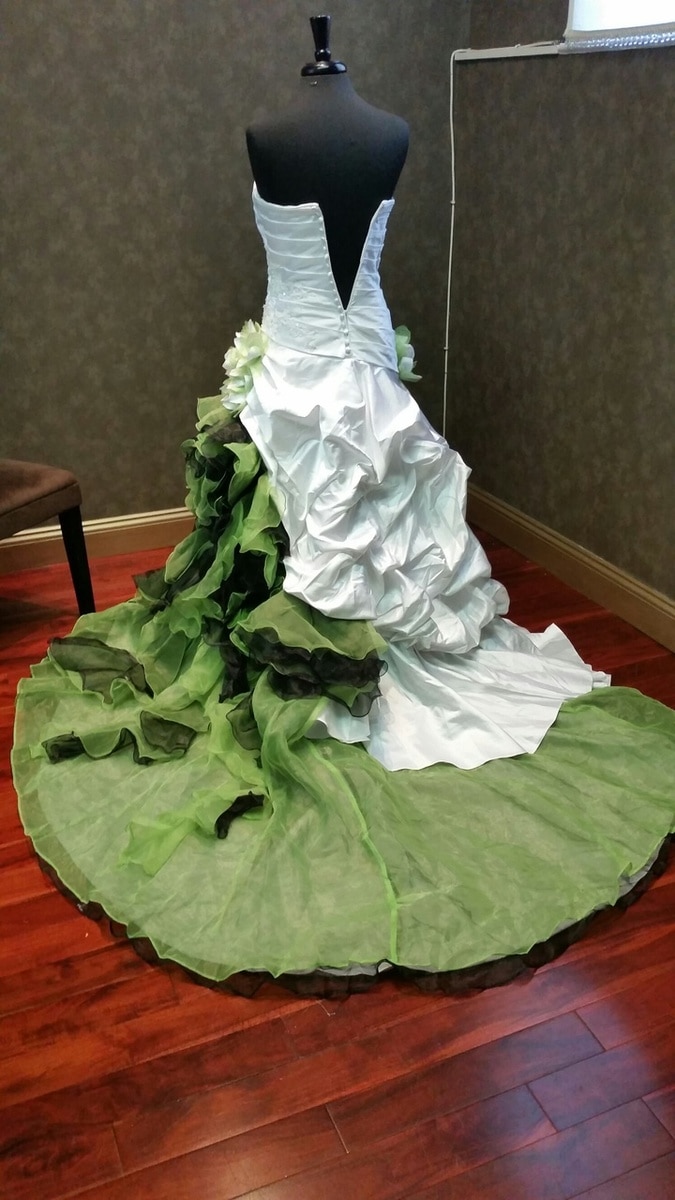
Her inspiration


Ruffled side - bustled

Ruffled side and train


Thursday, November 2, 2017

Spreading the love...

Now that the Christening gown is complete, Sarah had one last request...

She wanted to share a little of the gowns with other family members....the cousins

First she thought of making handkerchiefs out of the fabric that was left....handkerchiefs? some exclaimed, what will we do with those?....no, how about something else...

I suggested the idea of keepsake pillows, and showed her pictures of the ones I had made the previous year.  She liked that idea, but since she'd be handing them out at Christmas, she thought, how about "pillow ornaments" in the shape of a heart!

Sounds perfect to me!
So, I was asked to make 6 from the fabric of the grandmother's gown (champagne satin) and 2 from the fabric of her mother's gown (sheer white organdy and french lace). I also made Sarah a special pillow of her own, incorporating all three fabrics (including her jacket lace), as a surprise! And I wanted her pillow to be an absolute surprise, so I took a piece of fabric, serged the edges (neatly finished), wrapped the pillow in it and tied it with a bow - with the same ribbon that was used on the Christening gown.
I just wish I could be there when she opens that up!!!

12/10/17
Finally complete!....well...almost

As a final touch, knowing that these will be going on an airplane before distributing, I wondered "how can I package them individually?" I wanted to put each in its individual bag, but that wouldn't work as the bags would get crushed in packing...hmmm...it was the morning that they were being picked up and I thought - maybe I have enough fabric left to make a stocking!!!! Wow....I did. I took the bodice of the mother's gown, and made a stocking, using the cording from the grandmother's gown on the edges. Great idea! All the little pillow ornaments fit, they will now be easy to transport, and to distribute she can just pull one at a time out of the stocking!!!


          Pillow ornaments made from extra fabrics left from the christening gown created (below)


Wednesday, October 25, 2017

A Unique Christening gown

August 31, 2017
I received a message on my Facebook page regarding making a Christening gown!!!

Let me back up a little...
It's been a very busy bridal season for me, but was beginning to wind down. So I began to think of what I'd like to do when I am not so busy with bridal alterations....and the first thing that came to mind was "wow, I hope someone contacts me to make another christening gown!"
(I've made 5 so far, all from wedding gowns)

I don't even think it was a week, that I received that email on Facebook!

Here is the story behind this unique gown I was asked to make

I was asked if I could make a christening gown combining 3 generations of wedding gown/attire. WOW! Of course I said YES! So, the baby's mom said her mom, was shipping her Her wedding gown as well as her Grandmother's gown (are you following me?!) When she received them, we set up an appointment to meet, look at the fabrics I had to work with, and discuss the options.

September 7, 2017
The fabrics were brought over:

The (great) grandmother's gown from 1947, was a dark champagne, mid-weight satin, unlined, with an interesting wide corded hem. The wide cording was also on the top of the gown and the sleeves, as you can see in this photo. It hadn't been preserved, so the fabric had some areas of discoloration and deterioration in spots, but otherwise, a gorgeous piece of fabric to work with. Because the wide cording was so prominent on the gown, we decided to use that at the hemline, and allow it to be seen, beneath the lace.

The grandmother's gown from 1976, was a white Organdy fabric with tons of french lace on the top, sleeves and hem. There was beading on the top, but the beads had turned grey over time and were attached with glue (possibly what changed the color), so were not usable. The lining was a stiff fabric, comparable to sail cloth. She also brought the cathedral length veil to me, that had even more french lace, a little narrower than what was on the gown, on all the edges and the headpiece!

Baby's  mom had a lace jacket/topper she wore over her dress. It had lace sleeves and a wide band waist with a long sash.

Also specially requested included would be a bonnet and booties! And she wanted a BIG bow!!!!


After looking over all the materials I had to work with, and the condition of the fabrics, we decided to use the satin as the under-layer of the skirt and the sheer organdy on top, to give the top fabric an antique look. I was unsure about what to use on the bodice yet, so I just got started on the skirt and worked my way up!We were both super excited to get started on this!!!!

We had talked about incorporating all three (3) fabrics on the bodice. So I got to work. I used the satin underneath - just as with the skirt, Mommy's lace over that and I even used her sleeves, for the baby's sleeves, and some french lace appliques from the veil on top of that! The waistband and bow were made from Mommy's waistband, and the bow had french lace detail. I used a heavyweight interfacing to stiffen the bow - the only purchase I had to make. All other materials came directly from the gowns!


I received an email regarding Christening dates: Normally, I like to have 2 months to make an outfit like this, it's just so special and I like to put lots of details into it. I was given a few dates to choose from, so I chose the farthest one out! October 29, 2017 - not quite 2 months but I could work with it

The first week or so is just planning for me. A lot of thinking, laying out all the dresses in my work
space, looking at the details on each, and maybe even some sketching, before I begin cutting any fabric. Once it's cut, there's no going back, and I only have a limited amount of fabric to work with, so I have to be extra careful!

October 23, 2017
Gown is ready to go home!

Here is a link to my work in process photos and the end result :Heirloom Christening Gown
                                               I hope you enjoy this as much as I did!

Since the wide cording was so prominent in the satin gown, I imitated the hem here, and let it show beneath the lace


Tuesday, January 20, 2015

Classic style for a modern bride

Classic and Chic!


Custom wedding gown designed for a local bride. Originally contacted by phone in late fall 2014 , for the possibility of a gown for a September 2015 wedding. I was happy to accept the project!  Then we followed up by emails. The date had to be moved up - the bride and her fiance have several weddings to attend throughout 2015, so they moved their date up to February 2015, so that everyone they wanted could attend theirs, and they could attend their friend's weddings. Again, I accepted the task. Although, having a project such as this during the holiday season, would be a first for me. We met in November to discuss the style, and she already had the fabric, so I was able to get a good start before the holidays. First fitting was just after the first of the year, and the dress has had several transformations since then!

Click on Classic and Chic (above) for more photos on my facebook page ! And let me know what you think!


Sunday, November 16, 2014

Don't keep your wedding gown in a box!

You love your wedding gown. Whether it took hours, months, or the better part of a year to pick it out, you LOVE it. So when the big day is over, what now? The more popular thing to do is to have it professionally cleaned and preserved. This means it is tightly wrapped and put in a box, and wrapped again for a nice tight seal. That's what I did, and indeed, many brides do today.

Today, I was brought such a gown, in a neatly, and air tight sealed box. And what a beautiful gown it is. Satin underneath with lace overlay over the entire gown.

The request is one that is gaining popularity - to make a Christening outfit out of the once worn gown. Yes it was sealed, yes the baby is a girl, so I asked, as I had done before, "are you sure? what if when she is all grown up, she may want to wear your gown?" to which I was answered "yes, I'm sure!" Her only request was to make it gender neutral, not too frilly, because she wants it to be a family heirloom to be enjoyed by all.

So, I am happy to say, I am welcoming this request to make a gown, bonnet and jacket for this sweet baby girl to wear in just 3 weeks! "Use my creativity" she said....undoubtedly I will..